Replacing a cracked screen or swapping a dead battery can save you hundreds of dollars in repair fees and keep your device running longer. This phone repair guide for beginners delivers clear definitions, proven methods, and step-by-step examples so you can tackle common smartphone issues confidently.
You’ll learn which tools to use, how to identify key components, troubleshoot top problems, follow essential safety precautions, source reliable parts, verify your repair success, and understand why fixing your phone promotes sustainability. Repair Your Phone be equipped to perform basic repairs and join the growing DIY repair movement by the end. Phone won’t turn on for the following issue, this guide can help to find
Essential repair tools for beginners encompass specialized instruments that enable precise disassembly Repair Your Phone, safe handling of delicate parts, and secure reassembly. Having the right toolkit eliminates guesswork, speeds up the process, and prevents damage to critical electronics. For example, a heat gun softens screen adhesive, allowing smooth screen removal without cracking the glass.
Tool | Purpose | Why Essential |
Precision Screwdrivers | Remove and install tiny phone screws | Ensure accurate disassembly and reassembly |
Spudgers | Safely pry open casing and disconnect cables | Prevent component damage during opening |
Suction Cups | Lift screens without scratching the glass | Enable safe separation of display assemblies |
Heat Gun | Soften adhesive bonds on screens and batteries | Facilitate easier removal of glued components |
Anti-Static Wrist Strap | Ground technician to avoid ESD damage | Protect sensitive electronics from static discharge |
Adhesive Strips/Tapes | Secure components during reassembly | Maintain proper alignment and stability |
These essential tools improve precision and safety, allowing deeper exploration into their specific applications.
Before starting the process turn on Maintenance Mode before repairing device Precision screwdrivers deliver exact torque control to remove tiny screws without stripping heads. A typical starter set includes Phillips #000, Pentalobe, and Torx T2 bits that match popular smartphone screw patterns.
An opening pick alongside screwdrivers helps you gently separate snap-fit components without bending metal or plastic hinges. Selecting high-quality tools with hardened tips prevents wear and slipping, enhancing your control during disassembly and reassembly.
Spudgers act as mechanical levers to disconnect ribbon cables and pry apart layered assemblies without scratching circuitry. Suction cups lift screens uniformly, reducing pressure points that cause cracks. A heat gun softens strong adhesives behind screens and batteries, allowing parts to detach cleanly.
When a heat gun isn’t available, a hair dryer on low heat offers a budget-friendly alternative, though it requires longer application to achieve the same adhesive softening effect.
Electrostatic discharge (ESD) can damage microchips and logic boards during repair. An anti-static wrist strap grounds your body to a mat or grounded surface, neutralizing built-up static charges. Before starting, attach the wrist strap clip to an unpainted metal part of your workspace and wear the strap snugly around your wrist.
Consistent use of ESD protection prevents expensive component failures and supports reliable outcomes when handling sensitive electronics.
High-bond adhesive strips and double-sided foam tapes secure screens, batteries, and other modules back in place. Pre-cut adhesive kits fit popular phone models, ensuring even pressure distribution and preventing component shifting. Clear UV-curing adhesive can also be used for glass panels, offering a gap-free finish once cured.
Choosing the right adhesive thickness maintains your phone’s original water resistance and structural integrity. Transferring a SIM card is an easy step. Repairing a phone safely requires the right tools and a clear understanding of each internal component you’ll encounter next.
Smartphone components form the backbone of all repair tasks, as each part has a unique function and replacement process. Recognizing these parts reduces errors and guides your troubleshooting approach. For instance, knowing that the digitizer detects touch inputs helps you diagnose unresponsive displays.
Understanding component roles prepares you for targeted repairs and prevents mistaken part removals for Repair Your Phone.
Key smartphone parts work together to deliver functionality, and knowing their names and locations streamlines repairs.
Component | Function | Location |
Screen Assembly | Displays visuals and senses touch | Front panel |
Battery | Stores and supplies power | Behind back cover |
Charging Port | Enables power input for charging | Bottom edge |
Camera Module | Captures images and video | Upper back/front |
Speaker & Mic | Outputs sound and captures voice | Lower front/back |
Recognizing these core parts prepares you to understand their roles and repair needs.
A screen assembly combines the LCD panel, digitizer touch layer, and protective glass. The LCD creates vibrant images, the digitizer interprets finger movements, and the glass safeguards underlying layers. Separating these subcomponents requires careful heating and precise tools to avoid delamination.
Fully grasping this layered structure prevents accidental damage during screen replacements.
Most smartphones rely on lithium-ion batteries for high energy density and lightweight design. These batteries store power chemically and require careful handling to avoid punctures and thermal runaway. Always disconnect the battery connector before prying it loose, and dispose of old cells at certified recycling centers.
Safe battery handling reduces fire risks and supports sustainable disposal practices.
The charging port converts external current into regulated power for the battery and motherboard. Camera modules focus light onto sensors to capture images digitally. Speakers and microphones convert electrical signals into sound and back again. Each module connects via delicate flex cables that demand gentle detachment during repairs.
Awareness of component functions guides precise reassembly and testing, which leads us to tackling the most common problems next.
Common smartphone issues such as cracked screens, dead batteries, clogged ports, water damage, and poor audio often share straightforward repair procedures. Addressing these problems yourself boosts device longevity and reduces e-waste. For example, replacing a screen can restore full touch responsiveness within 30–45 minutes.
Mastering these fixes empowers you to handle the majority of beginner repair scenarios.
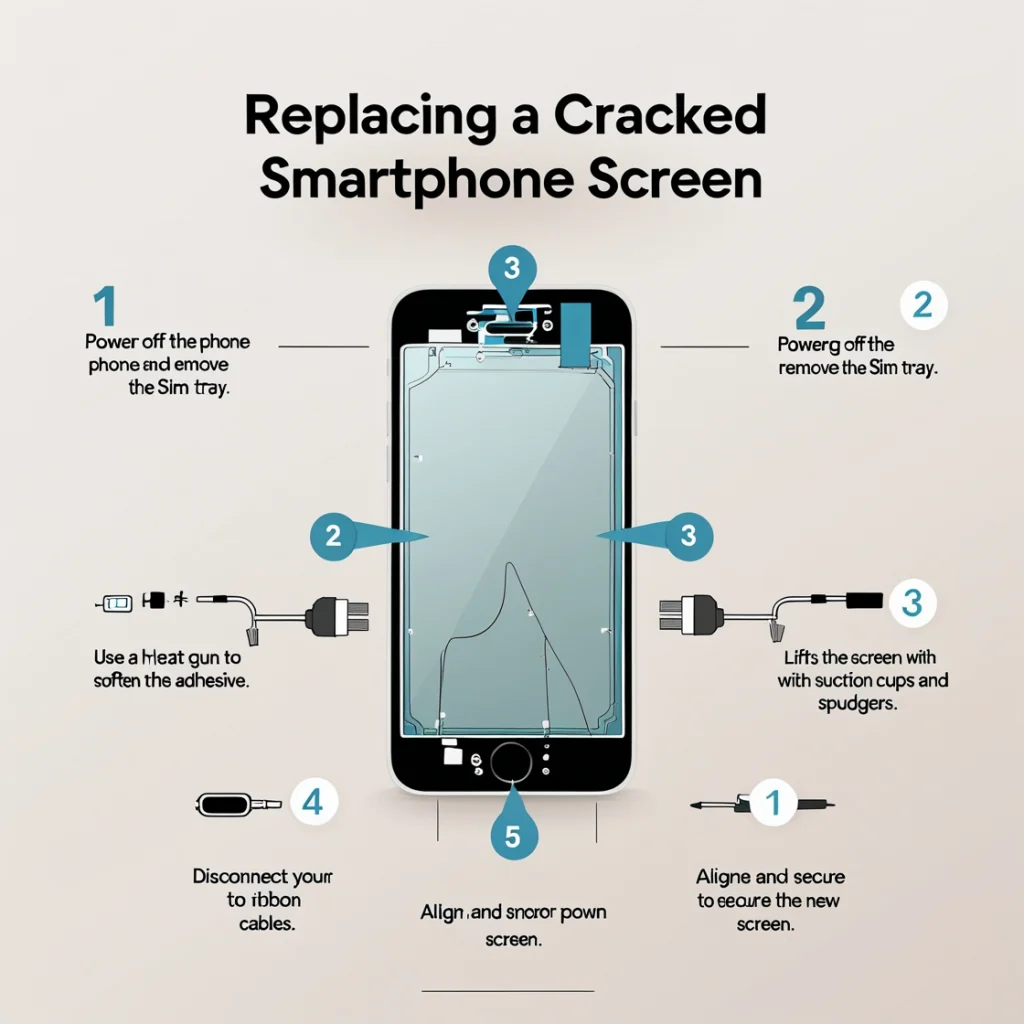
A cracked screen requires complete assembly replacement to restore display and touch functions.
Following these steps precisely ensures a secure fit and prevents accidental cable damage.
Replacing a battery involves careful disconnection to avoid short circuits.
This process enhances power performance and significantly extends your phone’s daily runtime.
Clogged or corroded ports cause charging failures and intermittent connections.
Power off and remove the back cover.
Routine port maintenance prevents long-term damage and keeps charging speeds at peak efficiency. Read the guide for clean your phone!
Swift water-damage intervention often rescues phones that would require a complete motherboard replacement.
Distorted or silent speakers often result from dust or loose connections.
Remove the bottom screws and back cover.
Having fixed the most frequent faults, prioritizing safety during every repair stage protects you and your phone from avoidable damage.
Observing safety measures throughout phone repair near me prevents personal injury and preserves component integrity. Adopting anti-static protocols, handling batteries responsibly, controlling heat application, and working with sharp tools correctly builds a professional-grade repair habit. These practices reduce the risk of catastrophic device failures.
Electrostatic discharge can sever microscopic traces on circuit boards. Always ground yourself with an anti-static wrist strap and place components on an ESD mat. Keep humidity levels between 40–60% to minimize charge buildup, and avoid synthetic fabrics that generate static.
Applying these measures maintains the reliability of sensitive electronic parts.
Lithium-ion batteries can catch fire if punctured or overheated. Wear safety glasses when prying and never bend or twist old cells. Store used batteries in non-conductive containers and recycle them at approved drop-off points to prevent environmental harm.
Responsible battery care supports both personal safety and accountable e-waste management.
Heat guns operate at high temperatures that can damage plastic frames and internal circuitry. Maintain a distance of at least 10 cm from the phone surface, move the nozzle continuously to avoid hotspots, and verify temperature with an infrared thermometer.
Controlled heating ensures adhesive softening without component warping.
Sharp blades and metal picks can slip and cause injury or scratch critical parts. Use tools designed for electronics with ergonomic handles and blade guards. Keep screwdrivers upright in a stand, and always retract blades between uses.
Adhering to proper tool handling techniques enhances both personal safety and repair quality. Understanding safe practices lets you focus on accurate repairs, after which sourcing the right parts becomes the next priority.
Selecting genuine, high-quality components ensures compatibility and lasting performance. Reputable suppliers offer manufacturer-certified parts, while quality indicators help distinguish genuine modules from low-grade alternatives. Investing in the right parts prevents repeat repairs and keeps your device fully functional.
Popular vendors with strong reputations carry OEM or high-grade aftermarket components for Repair Your Phone. Look for suppliers offering verified part numbers, customer reviews, and clear return policies. Websites specializing in repair kits for specific phone models often include installation guides and tool recommendations.
Buying from established sellers guarantees consistent part quality and technical support.
At Cellshoppe in Edmonton, we ensure that only genuine parts are used in all of our mobile phone repairs. We source our parts from these trusted suppliers, ensuring that every repair we conduct is of the highest quality. Whether it’s a screen repair, battery replacement, or other services, we take pride in delivering top-notch results using 100% genuine parts. For more information or to schedule a repair, visit Cellshoppe, where we prioritize both quality and customer satisfaction.
Smartphone models differ in screw layouts, connector types, and adhesive requirements. Always match the part’s model number and revision code to your device. Using an incompatible component risks misalignment, loose connections, or complete functionality loss.
Verifying compatibility before purchase prevents wasted time and ensures seamless Repair Your Phone. With parts in hand, you can reassemble your phone and confirm full functionality through systematic testing.
DIY phone repair reduces electronic waste and extends device lifespans by restoring functionality rather than opting for replacement. This sustainable choice aligns with the Right to Repair movement, empowering consumers to maintain their devices and minimize environmental impact. Self-repair also delivers significant cost savings compared to professional services.
Repairing common faults like cracked screens or worn-out batteries keeps devices in circulation longer, delaying their entry into landfills. According to industry data, replacing a battery can extend a phone’s usable life by up to two years, reducing the average replacement cycle from three to five years. Extending lifespan through repair directly reduces the 50 million tonnes of e-waste generated annually.
The Right to Repair movement advocates for consumer access to parts, tools, and information to repair their devices, challenging restrictions some manufacturers impose. This movement aims to empower consumers and promote sustainability in the electronics industry.
“Right to Repair” – Location of Cellshoppe Phone & Laptop Repair
This aligns with the article’s discussion of the Right to Repair movement and its impact on consumer rights and sustainable practices.
Empowered repair rights foster a more sustainable and consumer-friendly electronics ecosystem.
Average screen replacements at repair shops cost between $100 and $200, while DIY kits run $30–$60. Battery swaps often cost $50–$80 professionally versus $15–$25 for a self-install kit. Factoring in tool investments, DIY repair can recover its cost in just one or two fixes.
Significant cost savings reinforce why self-repair is both economically and environmentally advantageous. Repairing your phone sharpens technical skills and contributes to a greener electronics lifecycle.
Embarking on your first phone repair builds hands-on expertise, cuts costs, and champions sustainability. You can tackle common issues from screen cracks to battery failures with the right tools, a clear understanding of components, and strict safety practices. Systematic testing and proper part sourcing ensure reliable results, while the broader Right to Repair Your Phone ethos underscores your role in reducing e-waste. Now that you’re equipped with this beginner’s guide, grab your toolkit and restore your smartphone’s performance today.
Quick Questions!
Genuine parts feature manufacturer logos, precise fit tolerances, and robust connectors. Aftermarket parts vary in build quality and often lack official markings. Examine flex cable fonts, connector plating, and testing certifications to confirm authenticity.
Choosing genuine components improves repair success rates and device longevity.
A comprehensive post-repair checklist verifies that each module functions correctly before sealing your device. Systematic display, touch, charging, audio, and connectivity testing avoids follow-up visits and confirms successful repairs. This final verification step cements confidence in your DIY skills.
After reassembly, power on to confirm display clarity, touch responsiveness, and the absence of dead pixels. Monitor the battery level drop over a 15-minute idle period to ensure proper power delivery. Run diagnostic apps if available to check multi-touch sensors and display color accuracy.
Successful screen and battery tests validate core repair integrity.
Calibrating a lithium-ion cell involves charging to 100% and then discharging to around 5–10% before recharging. This cycle aligns the phone’s power-meter readings with the new battery’s capacity. Repeat once if readings remain inconsistent. Check the IOS battery health for the iPhone. Proper calibration enhances battery life estimation and overall power management.
Complex issues such as motherboard-level failures, advanced water corrosion, or micro-soldering tasks require specialized equipment and expertise. If multiple components fail after standard fixes or if you lack proper tools, entrust the repair to certified technicians.
Recognizing Repair Your Phone limits protects your investment and your device’s future performance. Having completed testing, you can appreciate how DIY repair saves money and supports a sustainable electronics culture.
Support


To Grab The Offer, Fill The Form and Submit Now!